


 21 Bay State Road, Boston MA


Expander Instructions
The Expander appliance we inserted in your mouth is non-removable and is designed to expand (widen) the palate. Its purpose is to correct a cross-bite, thus improving the way your top and bottom teeth meet.
The “key” that we gave you fits into the center of the appliance. After inserting it into the hole push it all the way to the back. It is important that you move the key as far back as it will go or it will be difficult to find the hole the next time. Either you or one of your parents can turn the expansion screw with the key.
The schedule for turning the appliance is as follows:
__________ One turn daily, more or less at the same time each day
__________ Two turns daily, one in the morning and one after dinner
* Please follow the suggested schedule. Too many turns may cause discomfort. Too few turns may not produce the desired result.
* It is normal to feel some tightness or discomfort after each turn. If necessary, take an Aspirin, Advil or Tylenol and/or rinse with warm salt water. However, if the pain persists, becomes severe or causes dizziness, stop turning the appliance and call the office.
* A fairly large space will open between the upper front teeth as you continue opening the appliance. Don’t be alarmed – it means that everything is working!!! Once you’ve stopped widening the appliance, the space will close naturally over the next few weeks.
* After meals and snacks, brush around the appliance and then gargle your mouth. It is important to keep the area clean in order to avoid an infection. A Water-Pik can be very helpful to clean this appliance and braces.
* Although it is rare, if the expansion appliance becomes partially detached from your teeth, stop turning the appliance, keep it in place as best as you can and call our office as soon as possible during office hours.
If you have any questions, please do not hesitate to call us.
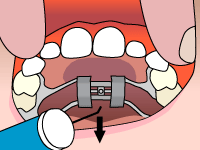
Step 1 In a well-lit area tip the patients's head back.

Step 2 Place the key in the hole until it is firmly in place.
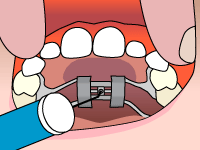
Step 3 Pushing the key towards the back of the mouth, you will notice the fender will rotate and the new hole will appear. The rotation stops when the key meets the back of the expander.
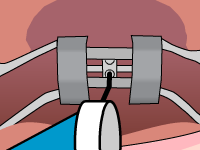
Step 4 By pushing back and down towards the tongue, remove the key. The next hole for insertion of the key should now be visible.